Sign In To Proceed 2z1z44

Don't have an ? 5p1p6t

osu! to create your own !
forum

Osu! Keyboard Recipe - For the DIY Minded 55694o

posted
Total Posts
95
Topic Starter
:D Okaerinasai minna!

UPDATE August 12, 2018: The newer guide has now been posted in my Github page as a doc file. I will keep the old guide here until I figure out how to format the newer guide into BBcode. Enjoy everyone :)

I would also like to clarify that this thread's official system is only in English. Those who understand other languages as well as English are encouraged to me through PM to relay other issues posted here in different languages. I do not think I can satisfactorily help you very well even with Google Translate. I might try, but GT has inconsistent luck with different languages.

UPDATE June 21, 2018: When posting your code in the threads, please use the [/code] format to properly format your code. It'd be nice code in its full, monospaced glory. Otherwise, carry on below

WELCOME EVERYONE !!!

Seriously, if you find yourself frustrated with the osu! keyboards going out of stock here's a guide on how to build your own controller. Keep in mind that this thread does not go into specific designs in order to keep this thread flexible for other gamemodes. (Mania controller, Taiko, etc.)

Also post your builds here if you'd like. It'd be nice to see what the maker community in osu! can come up with.


A shopping list to consider:


Electronics - the heart of any osu! keyboard build
- Teensy 3.1, 3.2, LC, etc... or Arduino-based stuff like the Micro, Trinket, Due, Leonardo, etc...
- 4 x Cherry MX switch of choice (salvaged or new) (Get plate-mount if mounting via the plate; use PCB mount if your case is thick)
- 4 x Cherry MX key caps of choice (salvaged or new)
- 24-30 AWG wire
- Solder
- Soldering Iron
- Arduino IDE w/ Teensy Bootloader
- LEDs (Optional)


Case - it matters not how you do it, as long as it holds the goods properly

The way of the 3D printer
- 3D printer (or get it printed somewhere)
- Nuts and bolts of choice (I used M5 nuts and bolts)
- Sketchup (or Blender; any 3D modelling program of choice)
- Filament of choice

The way of the laser or CNC cutting

- AutoCAD or Solidworks -> basically anything that can generate a g-code compatible file.
- Sheet metal or acryclic (1.5mm for metal, 2mm - 2.5mm acrylic)
- A shop that can cut for you or access to a cutting machine.

The way of the ghetto

- Some sheet acrylic or metal (or tupperware)
- A dremel


Some design tips

THE CASE
- To plate mount a Cherry MX switch, you must cut 14mm x 14mm squares each. A standard keycap (non-modifier) is 18mm x 18mm. You must space them accordingly in design and in fabrication. Data sheets for Cherry MX are online. Model your case based on that
- Make sure your plate isn't more than 2mm thick with plate-mounted switches; you will run into switch problems. Use PCB mounted switches with thick cases, preferably with hot glue.
- Plan a resonable size that will fit both microcontroller and the switches. If possible, do not mount microcontroller beneath switches, lest you want massive kinking like mine does
- Make sure the Micro-USB port is accessible. Unless you design the KB with a non-removable cable: in which case, plan enough space for that extra bit of cable.
-- When using a 3D printer, the slicing software needs a compatible file, so do some research on the printer you're using and export accordingly. Same applies to CNC/laser cutters.


Electronics

- Only the inputs need to be wired in parallel. Ground can all be wired in series as they all lead to the same ground pin.
- Adding LEDs? Find 3mm flange less LEDs. that (for a brand-new LED) the longer wire is generally positive and cannot be wired the other way.
- Be extremely careful of soldering. Unless yours is outfitted with headers or a breakout board, the dangers of frying your chip is high.


Coding/Extras

- Keyboard libraries are on github and Teensy website. Find those
- Don't bind two keys to the same keyboard button. Osu! locks up any key being pressed at the moment


-HAVE FUN!!
Example Wiring Diagram
I hope you know pullup resistor configurations. Google is you friend if you don't.
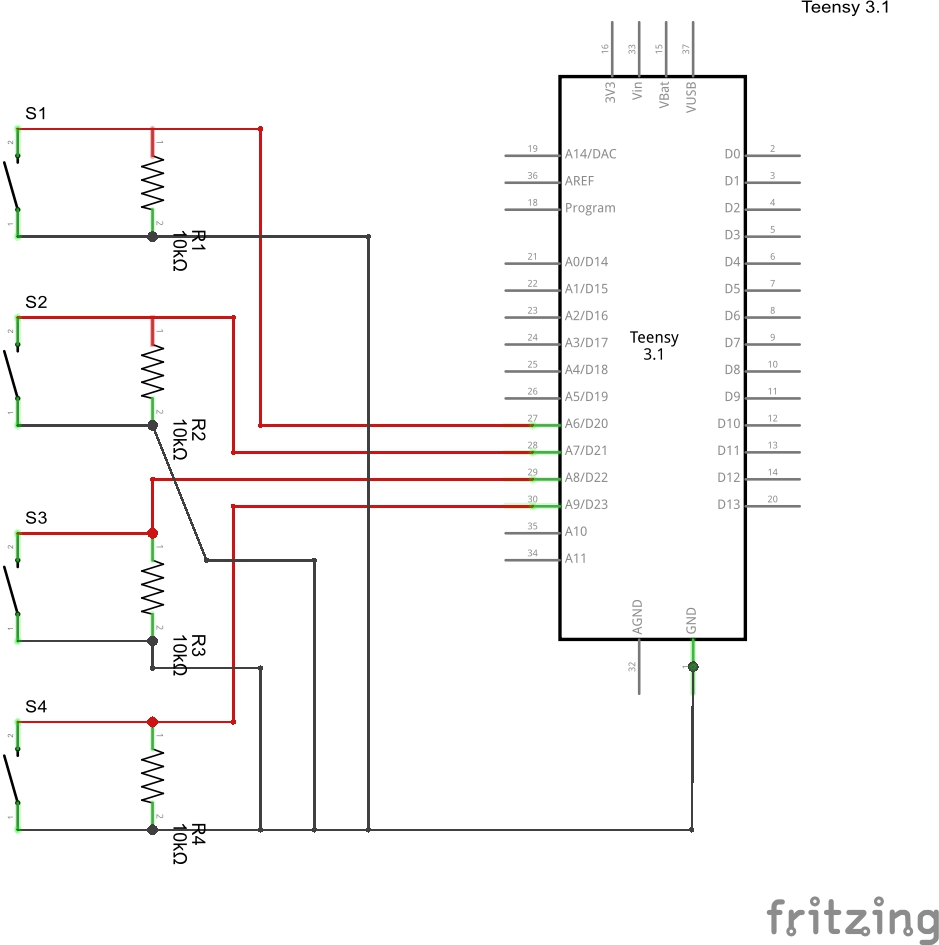
External resistors only if your microcontroller doesn't have internal resistors.

Example Code for the Teensy controller, mind that you will have to experiment a bit.
#include <Bounce.h> // this is needed to use the bounce library


#define KEYP_1 KEY_Z // here we are making it easier to change the key bindings later

// button pins
const int key_1 = 0; // input pin for your keyswitch; not necessary but helpful for doing other things like LED effects

Bounce button1 = Bounce(0, 8); // first number is pin number and second number is debounce time

void setup() {
pinMode(key_1, INPUT_PULLUP); // here we are telling the teensy what pin 0 is being used for
}

void loop() {

button1.update(); // this is reqired for your code to actually send the keypress to the computer

if (button1.fallingEdge()) { // fallingEdge is when the key is pressed
Keyboard.press(KEYP_1);
}
if (button1.risingEdge()) { // risingEdge is when the key is not pressed
Keyboard.release(KEYP_1);
}
}

Mind you that pullup function only works with resistors built into the controller. Otherwise, using external resistors, use:
pinMode(key_1, INPUT);

For adding more buttons:
#define <KEYP_X> <keycode> // keycode is the keycode for whatever you want the key to be


const int <key_X> = <pin> // pin is the pin your button is connected to

Bounce <buttonX> = Bounce(<Y>, 8); // Y is the pin number

pinMode(<key_X>, INPUT_PULLUP);

<buttonX>.update();

if (<buttonX>.fallingEdge()) {
Keyboard.press(<KEYP_X>);
}
if (<buttonX>.risingEdge()) {
Keyboard.release(<KEYP_X>);
}


Mine ended up like this
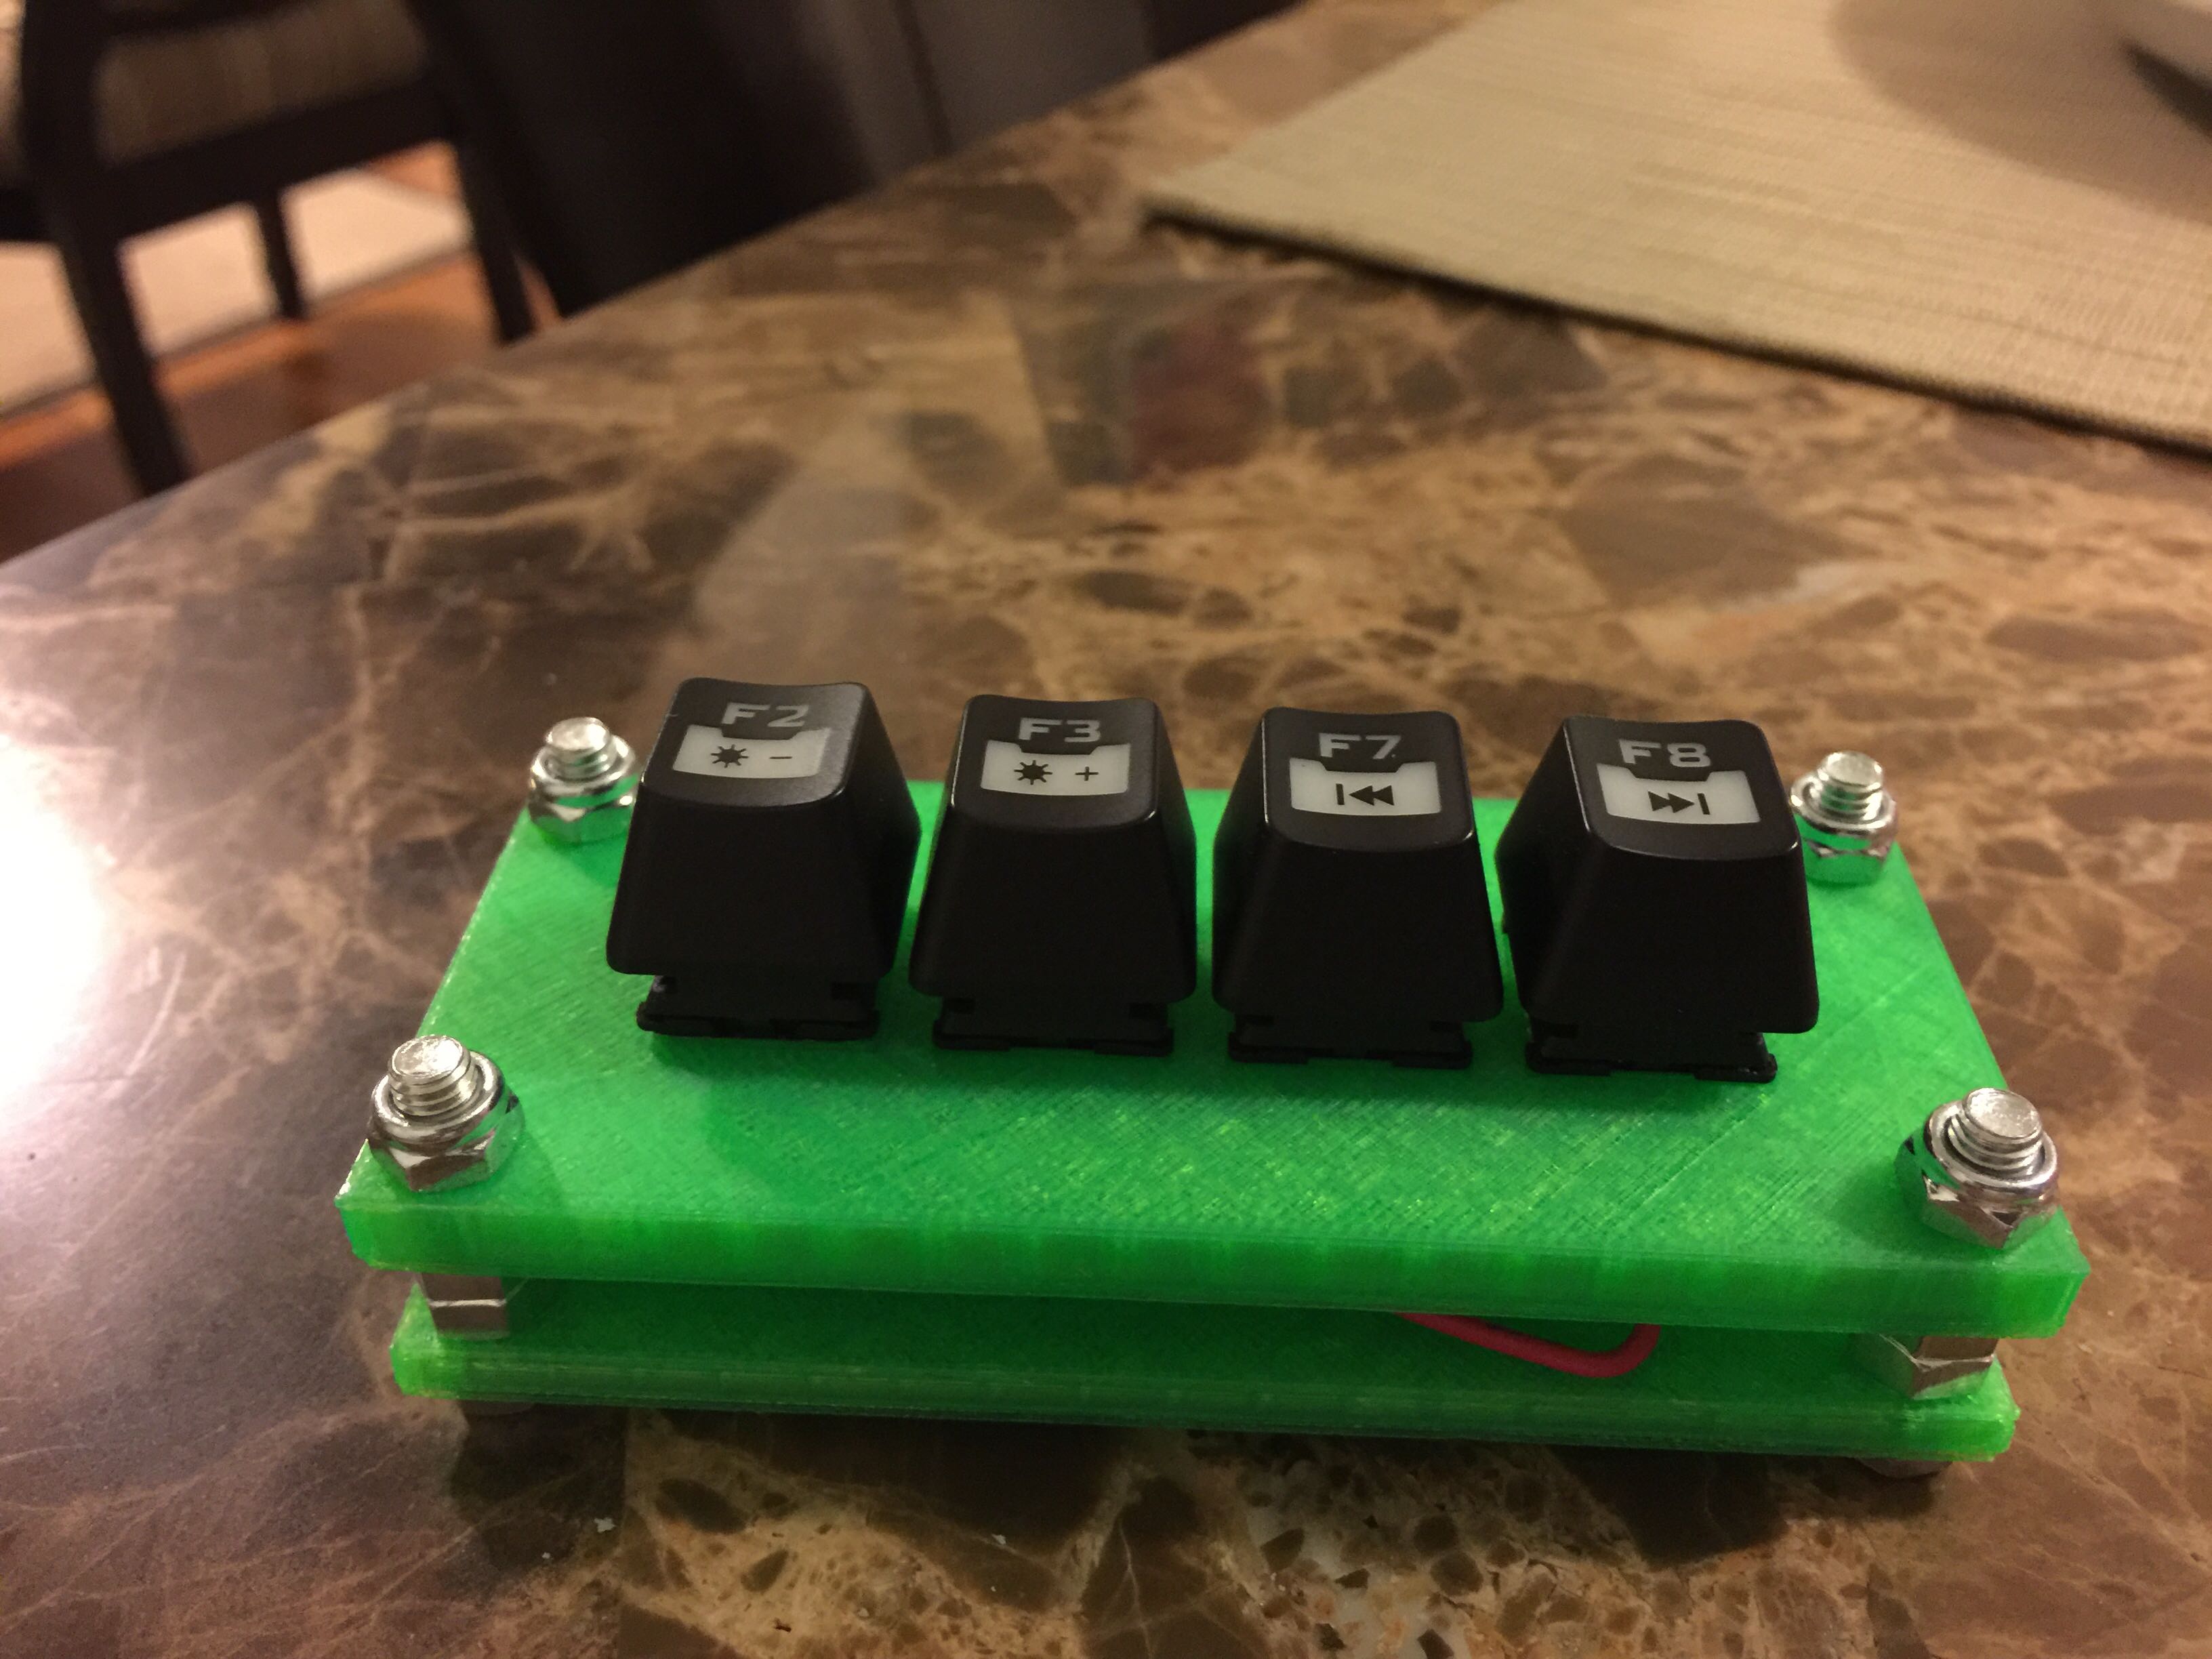


Sanwa build


New Build 12/29/2017


Feel free to go nuts with your design. Sorry the tutorial took forever to post

Some words from Thnikk himself:

Thnikk wrote: 5i2u2d

If there's anything I'd add, it would be that the Teensy LC is still the best option of the Teensy series for its price and is still more than powerful enough, even if you wanted to add LEDs and do some fancy stuff. Also, the trinket is a nice option but harder to use for a 4-key since there's only 3 pins you can use for input while communicating with the computer, so you'd have to use some magic with resistors to get multiple buttons working on the same pin. They are great as a cheap controller for a 2-3 button keypad, though!


FUTURE PROJECTS
- Hardware switch debouncer
- Interrupt-based actuation Too hard
- Underglow LEDs
- Sanwa build FINALLY DONE

Credits:
- Thnikk - code help
- PJRC - Teensy documentation
- Unnamed room in my university campus
- A handful of people in said room - 3D printing and modeling help
[/box]
howdo i get razer switches?? i heard all the cool kids have them D:
Topic Starter
Call Kailhua for a bulk order
it's sad that i can't get most of the list if not all
rip fun i could get making one
nice btw 8-)
ZenithPhantasm
Flaretech Optical Switch not out yet so no point
Pretty cool.
Is it comfortable to play on? Mostly asking because of the screws and the edges, and because it looks very light.
Topic Starter

Saphirshroom wrote: 323pf

Pretty cool.
Is it comfortable to play on? Mostly asking because of the screws and the edges, and because it looks very light.

I purposely didn't post any 3D files so that people would learn how to design their own, really. This thread only has design philosophies and tips, not instructions on how to build one.

August 12, 2018 --> 3D Files have been posted. 2015 Gambler, it's time to move on :)

In my situation though, I had a book elevate my hand so I wouldn't hit the edges. The screws were far enough to be a non-issue. The height of the switches were the bigger issue though...

Again, it's all trial and error for anyone undertaking this project. This project took about 4-5 prototype cases before going official.

KanoSet wrote: 3t6uh

it's sad that i can't get most of the list if not all
rip fun i could get making one
nice btw 8-)

pretty sure you can order the switches from digikey and the teensy controllers from sparkfun/adafruit.

Pair that with some sheet metal/plastic and a dremel and there shouldn't be a problem.
Topic Starter
Updated with new info, hope the new stuff is useful.

Also wondering if this thread should be in Development or G&R. It feels like a bit of both.

The Gambler wrote: 6p2n66

Updated with new info, hope the new stuff is useful.

Also wondering if this thread should be in Development or G&R. It feels like a bit of both.
the shipping fees would kill me am sure.. but if i had a chance i defo gonna give it a try school takes so much time :|
i forgot to mention that i don't have a 3d printer nor solder tool so this might be harder than to handle tbh
i would say ask a mod to move it.. development seems to fit more
ZenithPhantasm
I was hoping you would design custom housing for MX switches instead. Ones that are easily swappable.
Topic Starter

ZenithPhantasm wrote: 2c4mp

I was hoping you would design custom housing for MX switches instead. Ones that are easily swappable.
That's where the 3D printer comes in handy, as you can disassemble it easily. The points though, are still hand wired. Right now, I'm trying to look for SIP sockets for switches.

That, and I also might possibly have to use a prototyping PCB. But for the time being it's all hand-wired
Topic Starter

ZenithPhantasm wrote: 2c4mp

I was hoping you would design custom housing for MX switches instead. Ones that are easily swappable.
I could go solder right-angled female receptacles onto the teensy board with the GND I/O forked out to a 4-way splitter. Though you still need to solder wires to the switches themselves.
Topic Starter
Build #2 - Different Casing, Same parts


Looks good and nice guide!

Though I can't get most stuff on the list D:
Looks great! I'm planning to build my own osu! keyboard based on ATMEGA8, it may not be so easy in of coding, but this microcontroller is almost 20 times cheaper. Although I will probably use your wiring diagram as a reference. So, thanks for that!
Topic Starter
The man has spoken... Thnikk has graced us.
Topic Starter
Testing Build v2

Hey Guys!! I made my own keyboard today. i used MX reds for the keys and a Teensy 3.2. The case is bac becaue i dont have access to a 3d printer so i just had to bend a piece of 1.5 mm perspex.. :lol: Your code sample was very helpful !! thanks ! i set the keys to be K, T which are my initials :oops:


[box=Images]


Topic Starter
Holy shit I thought the thread was abandoned by now... Dude that is awesome.

As for the future builds I'm doing, they're on the back burner due to exams
by the way.. I got my custom Caps today.. so i updated the images :oops:

ArionW wrote: 475a5k

Looks great! I'm planning to build my own osu! keyboard based on ATMEGA8, it may not be so easy in of coding, but this microcontroller is almost 20 times cheaper. Although I will probably use your wiring diagram as a reference. So, thanks for that!


Did you ever build your keyboard? The Atmega8 doesn't have any USB hardware, so you would have to bit-bang everything. If you just need something cheap, you can buy Arduino Pro Micro clones pretty cheap.
Topic Starter

fb39ca4 wrote: 442w1u

ArionW wrote: 475a5k

Looks great! I'm planning to build my own osu! keyboard based on ATMEGA8, it may not be so easy in of coding, but this microcontroller is almost 20 times cheaper. Although I will probably use your wiring diagram as a reference. So, thanks for that!
Did you ever build your keyboard? The Atmega8 doesn't have any USB hardware, so you would have to bit-bang everything. If you just need something cheap, you can buy Arduino Pro Micro clones pretty cheap.
I'm pretty sure he could just use V-USB to create a low-speed USB device. Most Trinket-level devices I know do that as they are powered by the same chip.
I've got an Arduino Uno (A clone) that i bought a while back for something that didn't work, will that work?
Topic Starter
I'm not very knowledgeable about this; I've only confirmed this build with the build I have.

If your AVR chip has USB built-in (ATmega with U - like ATmega32U4 on the Leonardo and Micro) -definitely has and will work-, or has a built-in USB to serial converter (like the Uno, and Mega 2560), theoretically it should work though you'd have to dig online for actual references.

If not, you'd have to either use a USB to serial converter (like USB to FTDI serial cables) or emulate USB via V-USB, which I have not tried yet. Adafruit Trinkets are nice candidates for V-USB.

As for ARM-based chips, I've only tried using a Teensy, which already has built-in .
Looks very cool. I might try it soon!
dang, this is awesome!
Topic Starter
Sanwa switch build people!!!!


Also this is what happens when you don't for cable spacing... A wasted breadboard.


Some demos:


A hard drive case is actually a pretty solid choice for an arcade-style build.
didn't expect to find such project here. I used to work on Arduino projects and I can get the most of the stuff, but I don't know where to get Cherry MX switches. Maybe I'll try it once I get them since it looks interesting.
Topic Starter

iman mutou wrote: 4h3q67

didn't expect to find such project here. I used to work on Arduino projects and I can get the most of the stuff, but I don't know where to get Cherry MX switches. Maybe I'll try it once I get them since it looks interesting.
Works on any regular push button switch. The lovely Sanwa keypad is right above you :)

If not, Digikey or any other mechanical keyboard website like WASD or MechKB should have them in stock.
Better yet, check if Cherry themselves carry it in bulk.
OP has been helping me out and i'm currently in the process of building my own, thanks Senpai. o3o
I've been looking at a lot of these osu! keyboards lately. thnikk's keypads are very nice, as well as the one on the osu! store.
I do a lot of keyboards built from parts and this is nothing completely new to me, but its the first time I will be hand-wiring switches.

I'm just gonna use the arduino nano clone from dx, and a custom cnc cut acrylic housing.
What I will add to the previous designs is a palmrest. I'll come up with some more designs in the future.
Switches will be custom lubed 55g vintage cherry mx blacks. my all-time fave
Topic Starter

dongwon900 wrote: 55225h

I've been looking at a lot of these osu! keyboards lately. thnikk's keypads are very nice, as well as the one on the osu! store.
I do a lot of keyboards built from parts and this is nothing completely new to me, but its the first time I will be hand-wiring switches.

I'm just gonna use the arduino nano clone from dx, and a custom cnc cut acrylic housing.
What I will add to the previous designs is a palmrest. I'll come up with some more designs in the future.
Switches will be custom lubed 55g vintage cherry mx blacks. my all-time fave
Dayum, looking forward to that then :)

I only handwire in my build since I'm too broke for custom PCBs unlike noodlefighter and Antcenter xd
I will probably try to make one with a pro micro, Kailh Speed Copper switches and a case I have laying around. Maybe I will post some pictures then :D
Topic Starter

Vodes wrote: 6a2d17

I will probably try to make one with a pro micro, Kailh Speed Copper switches and a case I have laying around. Maybe I will post some pictures then :D
Will look forward to it.
Well. All the stuff came in yesterday morning. So I made a case out of some wood I found in my basement. It was my first time soldering anything. I'm okay with what came out of it xd It's a Pro Micro (5v, 16mhz) I bought from mehkee aswell as the keyswitches (Kailh Speed Copper). The keycaps are some cheap blue ones from banggood.

As for people living in shipping was quite fast except for the mehkee stuff. (Almost 2 weeks for that)

What's better these keypads can be made with almost anything.
I made mine with old pad PCB.
Only soldered switches properly and it works.

Overall cost=2 switches 0.52$
Yes i know it looks like shit, but hey it works.
Topic Starter

Vodes wrote: 6a2d17

Well. All the stuff came in yesterday morning. So I made a case out of some wood I found in my basement. It was my first time soldering anything. I'm okay with what came out of it xd It's a Pro Micro (5v, 16mhz) I bought from mehkee aswell as the keyswitches (Kailh Speed Copper). The keycaps are some cheap blue ones from banggood.

As for people living in shipping was quite fast except for the mehkee stuff. (Almost 2 weeks for that)

Good job with the build there. Can't wait to see the demo.

Kiciuk wrote: 673ys

What's better these keypads can be made with almost anything.
I made mine with old pad PCB.
Only soldered switches properly and it works.

Overall cost=2 switches 0.52$
Yes i know it looks like shit, but hey it works.
A friend of mine built an SDVX controller with a shoebox... A cardboard one.

He still kicked my ass with it :(

Waiting for that demo ;)
Here is a bad video for my keyboard
Topic Starter

Vodes wrote: 6a2d17

Here is a bad video for my keyboard
Don't worry, mine sounds like a toy too. My Sanwa build sounds like hitting a shoebox with a stick. :)

The Gambler wrote: 6p2n66

Vodes wrote: 6a2d17

Here is a bad video for my keyboard
Don't worry, mine sounds like a toy too. My Sanwa build sounds like hitting a shoebox with a stick. :)
Imaginating it is hilarious enough xD
TV-Size Kun
For Teesy 2.0 and 2.0 ++ this will work?
Topic Starter

TV-Size Kun wrote: 361u5a

For Teesy 2.0 and 2.0 ++ this will work?
Yes, just to select Teensy 2.0 or 2.0++ in the boards sections of the Arduino, assuming you are using Teensyduino.
I know this post is pretty old, but I just want to say thank you for this guide. It helped me a lot!
Topic Starter

DireDoge wrote: 303v4u

I know this post is pretty old, but I just want to say thank you for this guide. It helped me a lot!
Pics or it didn't happen :)

Also, no problem. Kinda wish this was stickied though.
Topic Starter
New build posted on the first post. Happy holidays everyone!!
Topic Starter
New build for you guys. This time, a possible 8-key design, using an Adafruit Feather M0 for the controller.


I can't understand any thing about some techinacl shit anyone can help me

In indonesia someone sell it the price is too high about 40$ and I can't use my credit card too (controlled by my mom) :( :(
Topic Starter

quinton69 wrote: u7362

I can't understand any thing about some techinacl shit anyone can help me

In indonesia someone sell it the price is too high about 40$ and I can't use my credit card too (controlled by my mom) :( :(
RIP... Hopefully I could update the guide as well when I have time.
Anyone know teensy alternative for the no-no keyboard i found the Leonardo one help me pls and in Indonesia it's very rare to found 3d printing place
Topic Starter

quinton69 wrote: u7362

Anyone know teensy alternative for the no-no keyboard i found the Leonardo one help me pls and in Indonesia it's very rare to found 3d printing place
Leonardo is perfectly adequate for the job, since it contans all the native USB hardware needed for the keyboard functions to work. The only reason I don't recommend these is that their footprint is quite large. Take a look at some sample boards below:

Leonardo:
Teensy LC/3.2:
Pro Micro:
Trinket M0 (in inches):
It all depends on the chip you are using, but also importantly, how the board is implemented.

At some point, you might also have to leard KiCAD/Eagle to learn how to mount chips directly to PCB. Nono most likely has already done that, along with Techkeys, MaxKeyboard, etc...
Can you send me the Arduino coding pls I'm using the two keys shift and z

Do you know the alternative for the pcb
Topic Starter

quinton69 wrote: u7362

Can you send me the Arduino coding pls I'm using the two keys shift and z

Do you know the alternative for the pcb
Code is in the OP, though you will have to modify it for your purposes.

quinton69 wrote: u7362

Can you send me the Arduino coding pls I'm using the two keys shift and z

Do you know the alternative for the pcb
I already made my code for the pro micro. You just need to tell me your keys and the pins, that you're using, then i'll do it for you. (If you'll use the pro micro ofc)
Is this will work with arduino nano ? or i must use like leonardo or uno? I want to use arduino Nano or Mini because it's cheap here xD
Thx to this guide i have managed to make my own osu keyboard.I wanted to thank you and here are some pictures of how mine turned out.


Also i have never wrote code for an arduino pro micro, but this is what i came up with.:

int buttonPin = 9;
int Pinbutton = 6;
#include <Keyboard.h>
void setup()
{
pinMode(buttonPin, INPUT);
digitalWrite(buttonPin, HIGH);
pinMode(Pinbutton, INPUT);
digitalWrite(Pinbutton, HIGH);
}

void loop()
{
if (digitalRead(buttonPin) == 0)
{
Keyboard.press('z');
delay(5);
}
if (digitalRead(buttonPin) == 1)
{
Keyboard.release('z');
}
if (digitalRead(Pinbutton) == 0)
{
Keyboard.press('x');
delay(5);
}
if (digitalRead(Pinbutton) == 1)
{
Keyboard.release('x');
}
}

It works just fine but if someone can edit it to make it better i would appreciate it.
THX FOR THE AWESOME GUIDE. :)
Topic Starter
^^ No problem :)

Will update the guides soon. Hopefully by this week.
thanks for the interesting article, I'm already going to buy all the details and start assembling))

ikorus1 wrote: 1q5l3k

Thx to this guide i have managed to make my own osu keyboard.I wanted to thank you and here are some pictures of how mine turned out.


Also i have never wrote code for an arduino pro micro, but this is what i came up with.:

int buttonPin = 9;
int Pinbutton = 6;
#include <Keyboard.h>
void setup()
{
pinMode(buttonPin, INPUT);
digitalWrite(buttonPin, HIGH);
pinMode(Pinbutton, INPUT);
digitalWrite(Pinbutton, HIGH);
}

void loop()
{
if (digitalRead(buttonPin) == 0)
{
Keyboard.press('z');
delay(5);
}
if (digitalRead(buttonPin) == 1)
{
Keyboard.release('z');
}
if (digitalRead(Pinbutton) == 0)
{
Keyboard.press('x');
delay(5);
}
if (digitalRead(Pinbutton) == 1)
{
Keyboard.release('x');
}
}

It works just fine but if someone can edit it to make it better i would appreciate it.
THX FOR THE AWESOME GUIDE. :)
Nice one! I built mine with the Pro Micro too. Isn't your keyboard a bit tall? Seems hard to get your fingers to
Edit: Why did you put delays in the code?
hello, today my arduino came to me and I finally made my custom small keyboard .. That's how it looks so far (I plan to paste it with a print and add the LEDs). Here is the code itself (took from the author above and reworked under 6 buttons). Good luck to all

int buttonPin1 = 4;
int buttonPin2 = 5;
int buttonPin3 = 6;
int buttonPin4 = 7;
int buttonPin5 = 8;
int buttonPin6 = 9;
#include <Keyboard.h>
void setup()
{
pinMode(buttonPin1, INPUT);
digitalWrite(buttonPin1, HIGH);
pinMode(buttonPin2, INPUT);
digitalWrite(buttonPin2, HIGH);
pinMode(buttonPin3, INPUT);
digitalWrite(buttonPin3, HIGH);
pinMode(buttonPin4, INPUT);
digitalWrite(buttonPin4, HIGH);
pinMode(buttonPin5, INPUT);
digitalWrite(buttonPin5, HIGH);
pinMode(buttonPin6, INPUT);
digitalWrite(buttonPin6, HIGH);
}

void loop()
{
if (digitalRead(buttonPin1) == 0)
{
Keyboard.press('z');
delay(5);
}
if (digitalRead(buttonPin1) == 1)
{
Keyboard.release('z');
}
if (digitalRead(buttonPin2) == 0)
{
Keyboard.press('x');
delay(5);
}
if (digitalRead(buttonPin2) == 1)
{
Keyboard.release('x');
}
if (digitalRead(buttonPin3) == 0)
{
Keyboard.press('c');
delay(5);
}
if (digitalRead(buttonPin3) == 1)
{
Keyboard.release('c');
}
if (digitalRead(buttonPin4) == 0)
{
Keyboard.press('`');
delay(5);
}
if (digitalRead(buttonPin4) == 1)
{
Keyboard.release('`');
}
if (digitalRead(buttonPin5) == 0)
{
Keyboard.press(KEY_TAB);
delay(5);
}
if (digitalRead(buttonPin5) == 1)
{
Keyboard.release(KEY_TAB);
}
if (digitalRead(buttonPin6) == 0)
{
Keyboard.press(KEY_ESC);
delay(5);
}
if (digitalRead(buttonPin6) == 1)
{
Keyboard.release(KEY_ESC);
}
}
Topic Starter
Awesome :)


thnikk osu keypad style
2 hours of solding, 15 min of programming

Code:

#include <Keyboard.h>

void setup() {
Keyboard.begin();
Serial.begin(9600);
}

void loop() {
Serial.println(digitalRead(A2));
if (digitalRead(A2) == HIGH) {
Keyboard.press('w');
}
else {
Keyboard.release('w');
}

Serial.println(digitalRead(A1));
if (digitalRead(A1) == HIGH) {
Keyboard.press('e');
}
else {
Keyboard.release('e');
}
}
Hey, thanks OP for this post!

5 days ago I didn't know anything about Arduinos, Mechanical Keyboards, soldering, 3D-modelizing... learnt it all, and I managed to end up with this, which I'm pretty proud of:

Basically, I bought a Chinese Arduino Pro Micro clone on ebay for less than 3€ and some Cherry MX Silver Switches for about 5€ (I recommend not buying these for developping purposes, they're very expensive on eBay, maybe buy Kailh or any other brand for prototyping), made the case 3D-printed on a P2P website for 6€, and bought for 2.5€ of screws/bolts.

I first learned Arduino code from scratch and gathered some help from the previous posters on this thread, but I end up with my own code, in which I added some extra LEDs (because I don't have any SMD LEDs to add to my switches for now), and I'm planning to add 3 extra buttons (Space, Escape, and Retry) in the future.

Then I bought a soldering iron and started prototyping my keyboard with some breadboard and jumper wires, to learn code and experiment a bit more. When I ended up with something functionnal, I started deg the case (on Tinkercad, very simple to use) and got it printed.
The holes I designed were made for M5 Screws (5.25mm diameter), but they didnt fit, so I ended up using M4 screws (working pretty well).

Here is the code I used:
#include <Keyboard.h>

int W = 2;
int X = 8;
int LED1 = 6;
int LED2 = 7;

void setup()
{
Serial.begin(9600);

pinMode(W, INPUT);
pinMode(LED1, OUTPUT);
digitalWrite(W, HIGH);

pinMode(X, INPUT);
pinMode(LED2, OUTPUT);
digitalWrite(X, HIGH);
}

void loop(){

if (digitalRead(W) == 0)
{
Keyboard.press('z');
digitalWrite(LED1, HIGH);
delay(5);
}


if (digitalRead(W) == 1)
{
Keyboard.release('z');
digitalWrite(LED1, LOW);
}


if (digitalRead(X) == 0)
{
Keyboard.press('x');
digitalWrite(LED2, HIGH);
delay(5);
}

if (digitalRead(X) == 1)
{
Keyboard.release('x');
digitalWrite(LED2, LOW);
}
}

(keep in mind that I'm using a AZERTY keyboard, that the Arduino IDE doesn't recognize (I guess?))

If you have some questions before jumping into it, don't hesitate ! It's such an easy and great project to start with !

I can send you the 3D file of the case, but it will be even better if you find your own design and let your mind express.

PS: Cherry MX Silver Speed switches are amazing, getting from laptop-keyboard to those is for real amazing !
Topic Starter

C0MP0T3 wrote: 1g6i6q

-snip-


Your build looks a lot like my second build. Congrats!

I even used M4 bolts on my second build as a matter of fact :)
Topic Starter
UPDATE July 20, 2018:

So yeah, just finished summer school recently and currently working on revamping the guide as usual. Really, this time I am doing it since it will be published on other forums/sites as well. Hopefully those will address some issues associated with the first revision of the keyboard build guide.

The guide will be focused towards an 8-key model that I posted in this thread earlier this year. Any deviations in the design will be an exercise for the end . Of course, PMing me for help will be answered as quickly as possible.

For now, Sanwa build V2 in progress. I tried to do honeycomb walls for this build.

So im staring with a pro micro arduino, can i have the code for two buttons ? I use z and x

AddDominator wrote: 2p3o6q

So im staring with a pro micro arduino, can i have the code for two buttons ? I use z and x

U must make a picture of your arduino, then I will help u
Topic Starter
The example code in the first post should also work for Pro Micro, since it uses Arduino keyboard library, not a Teensy specific one.

UnleashedMyself wrote: 294t

AddDominator wrote: 2p3o6q

So im staring with a pro micro arduino, can i have the code for two buttons ? I use z and x

U must make a picture of your arduino, then I will help u

Since my camera broke, i can only use internet picture
https://imgur.com/a/1J6D2w8
P/S: Does Pro Micro have internal resistors ?

The Gambler wrote: 6p2n66

UPDATE July 20, 2018:

So yeah, just finished summer school recently and currently working on revamping the guide as usual. Really, this time I am doing it since it will be published on other forums/sites as well. Hopefully those will address some issues associated with the first revision of the keyboard build guide.

The guide will be focused towards an 8-key model that I posted in this thread earlier this year. Any deviations in the design will be an exercise for the end . Of course, PMing me for help will be answered as quickly as possible.

For now, Sanwa build V2 in progress. I tried to do honeycomb walls for this build.


I'm starting to play Mania more and more, I may be doing a 4k keyboard later ! What's "Sanwa" build?
Topic Starter

C0MP0T3 wrote: 1g6i6q

I'm starting to play Mania more and more, I may be doing a 4k keyboard later ! What's "Sanwa" build?


Sanwa V1 is posted in the first post; it is basically the osu! keypad using arcade buttons. The most prominent switch amongst arcade setups use circular Sanwa buttons.
I have add keyboard and hid library but it keep showing this error, please help
https://imgur.com/a/eqTd1XI
Topic Starter

AddDominator wrote: 2p3o6q

I have add keyboard and hid library but it keep showing this error, please help
https://imgur.com/a/eqTd1XI


You need Keyboard.begin() in setup() before doing any keyboard presses.
How to add more LED mode for RGB ? Like pressing a button and it will change the mode. My code is like this
int ButtonZ = 9;
int ButtonX = 10;


void setup()
{
pinMode(ButtonZ, INPUT);


pinMode(ButtonX, INPUT);


}

void loop()
{
if (digitalRead(ButtonZ) == 0)
{
Keyboard.press('z');

delay(5);
}
if (digitalRead(ButtonZ) == 1)
{
Keyboard.release('z');

}
if (digitalRead(ButtonX) == 0)
{
Keyboard.press('x');

delay(5);
}
if (digitalRead(ButtonX) == 1)
{
Keyboard.release('x');

}
}

AddDominator wrote: 2p3o6q

How to add more LED mode for RGB ? Like pressing a button and it will change the mode. My code is like this
int ButtonZ = 9;
int ButtonX = 10;


void setup()
{
pinMode(ButtonZ, INPUT);


pinMode(ButtonX, INPUT);


}

void loop()
{
if (digitalRead(ButtonZ) == 0)
{
Keyboard.press('z');

delay(5);
}
if (digitalRead(ButtonZ) == 1)
{
Keyboard.release('z');

}
if (digitalRead(ButtonX) == 0)
{
Keyboard.press('x');

delay(5);
}
if (digitalRead(ButtonX) == 1)
{
Keyboard.release('x');

}
}

just use switch()
Anyone have a PCB guide ? Plz Help
Деньга дай =) нет деняг
Topic Starter
UPDATE August 12, 2018:

Hi again everyone,

After slow progress on my end due to juggling different projects I have finished a rough draft of the newer updated guide. Hopefully, even with the rough formatting, people should find the ideas expressed in the doc easier to absorb than last time. However, for the time being, the guide exists as a doc file and currently not formatted to osu! forum standards.

Also, SANWA V2 has been finished.

Coming back, just to say thanks about this nice tutorial, you're the best
https://imgur.com/a/2WP4SMc
Topic Starter

AddDominator wrote: 2p3o6q


Oof... the betrayal is real xD

The Gambler wrote: 6p2n66

AddDominator wrote: 2p3o6q


Oof... the betrayal is real xD

Thanks you for the tutorial <3
I've made an osukeyboard with a
mouse(ve broken、and a little box to cover them,but now it still have no lights and not goodlooking at all
Here I am Looking forward to develop an new kind of osuing key board which's able to put one all hand on it and give players a much more comfortable enverment to power there brain(IQ+10
(:DL

ZisonZishen wrote: 6v3o1b

I've made an osukeyboard with a
mouse(ve broken,keys and a little box to cover them,but now it still have no lights at all,and not goodlooking
Here I am Looking forward to make an new osu key board which's able to put on fingers and more cheap(:D
and it's still an idea lol

https://www.youtube.com/watch?v=jM598vSvPu0&t=221s Try this

AddDominator wrote: 2p3o6q

ZisonZishen wrote: 6v3o1b

I've made an osukeyboard with a
mouse(ve broken,keys and a little box to cover them,but now it still have no lights at all,and not goodlooking
Here I am Looking forward to make an new osu key board which's able to put on fingers and more cheap(:D
and it's still an idea lol

https://www.youtube.com/watch?v=jM598vSvPu0&t=221s Try this

ahh,39

Skylone18 wrote: 38454c

Just a question;
Are you using any resistors?
I see a resistor in the first figure of your guide, but on second figure and in the third one, I do not see any.

Arduino leonardo don't need resistors
https://imgur.com/a/8cU9PEZ
Thanks to Ruqimao and Gambler <3
A few billion years late, but how do you suppose you would get cherry mx slivers?
Topic Starter

genericgarbage wrote: 6585i

A few billion years late, but how do you suppose you would get cherry mx slivers?


I don't think MX Silver is marketed as a custom keyboard product. I would rather you check out other switches instead: https://input.club/the-comparative-guide-to-mechanical-switches/

Since you said you wanted Silvers, I suggest looking at other equivalents like Kailhua Red, BOX Red, Gateron Clears, Matias Linear, etc.
Topic Starter
UPDATE 02/09/2019: Small updates for you guys. I ed the full version of my own working code onto the repository, along with some repo cleaning. Hopefully, everything should make a bit more sense.

I have also prototyped some PCBs along the way, like the 8-Pack and the 4-Square, each under their own repositories in my . Should make for some more compact and interesting builds.

Otherwise, just letting you know that I'm still here (as once in osu!, always in osu!).

Happy clicking :)
Hey, I want to buy Redragon ARYAMAN K569 (it comes with Outemu blue switches). I wanted to ask if it's possible to replace a few switches in it with other switches? (like i want to replace one Outemu blue switch with Cherry MX Red). Is that doable easily?

srafay wrote: 714c3d

Hey, I want to buy Redragon ARYAMAN K569 (it comes with Outemu blue switches). I wanted to ask if it's possible to replace a few switches in it with other switches? (like i want to replace one Outemu blue switch with Cherry MX Red). Is that doable easily?

Does the keyboard have removable switch feature? If so you can just use keypuller to remove the switch and replace it. Otherwise you have to resolder the PCB to remove the switch and reinstall it again, which I don't recommend.
Here's an example of removable switch keyboard that I have

[Zarc] wrote: 475g54

srafay wrote: 714c3d

Hey, I want to buy Redragon ARYAMAN K569 (it comes with Outemu blue switches). I wanted to ask if it's possible to replace a few switches in it with other switches? (like i want to replace one Outemu blue switch with Cherry MX Red). Is that doable easily?

Does the keyboard have removable switch feature? If so you can just use keypuller to remove the switch and replace it. Otherwise you have to resolder the PCB to remove the switch and reinstall it again, which I don't recommend.
Here's an example of removable switch keyboard that I have


Thanks for replying. The keyboard you have seems to be available only in your country I guess. After checking it's specs, it seems that it has Outemu blue switches. How is your experience with these switches (stream maps in which you need to double tap or maps in which you need to tap faster)
Topic Starter

srafay wrote: 714c3d

Hey, I want to buy Redragon ARYAMAN K569 (it comes with Outemu blue switches). I wanted to ask if it's possible to replace a few switches in it with other switches? (like i want to replace one Outemu blue switch with Cherry MX Red). Is that doable easily?


Yes, you will have to desolder the switch and LED using a soldering iron, and solder wick/desoldering pump. You have to be careful in the process as you do not want to rip out PCB pads when removing the switch.

After you have desoldered the old switch, you will need to clean the hole where the switch pin used to be, then solder in the new switch, plus LED.

srafay wrote: 714c3d

[Zarc] wrote: 475g54

srafay wrote: 714c3d

Hey, I want to buy Redragon ARYAMAN K569 (it comes with Outemu blue switches). I wanted to ask if it's possible to replace a few switches in it with other switches? (like i want to replace one Outemu blue switch with Cherry MX Red). Is that doable easily?

Does the keyboard have removable switch feature? If so you can just use keypuller to remove the switch and replace it. Otherwise you have to resolder the PCB to remove the switch and reinstall it again, which I don't recommend.
Here's an example of removable switch keyboard that I have


Thanks for replying. The keyboard you have seems to be available only in your country I guess. After checking it's specs, it seems that it has Outemu blue switches. How is your experience with these switches (stream maps in which you need to double tap or maps in which you need to tap faster)

I'm using Outemu brown now though, I bought them separately. My keyboard can only use Outemu switch, that sucks. They are ok but It feels like Cherry MX has shorter travel distance than Outemu. I can play stream maps just fine with them, sometimes I can stream up to 220 bpm.
LJBox

shortpotato wrote: 313k5y

howdo i get razer switches?? i heard all the cool kids have them D:
Those switches arent very good
thx for the list, i will try to do it when i get the time/money for it ofc qwq
Please sign in to reply.

New reply 3p1g1j